Introduction
Zenbot is a free and open source bitcoin and crypto trading bot. It is used in command line and relies on Node.js and MongoDB. It is a serious competitor of Freqtrade that we have already mentioned. It is used on the command line and is therefore rather reserved for confirmed users. To create trading bots without technical knowledge, visit Botcrypto!
Prerequisites
This tutorial has been realized on a Ubuntu 20.04 server.
We will need Node.js, MongoDB and git.
- To install the various prerequisites, run the following command:
sudo apt update && sudo apt install git && sudo apt install nodejs && sudo apt install npm && sudo apt-get install build-essential mongodb
Zenbot’s installation
- First, we will clone the git repository by executing the command below:
git clone https://github.com/deviavir/zenbot.git
- Once the download is complete, we will go to the zenbot folder:
cd zenbot
- Then we will install the dependencies with the following two commands:
npm install
sudo npm link
Zenbot’s configuration
Zenbot can be configured in different ways. We will create a configuration file based on the example provided.
- Execute this command to create your conf.js configuration file.
cp conf-sample.js conf.js
You can if you want check the different possible configurations of Zenbot by opening this file but for this tutorial we will keep the basic settings.
Zenbot’s usage
We will see how to do a backtest, a test in the past.
First you can use the command ./zenbot.sh list-selector to see all available pairs.
- To perform a backtest we will need the data of a market. We will retrieve the BTC/EUR market of Coinbase Pro over 1 day with this command:
./zenbot.sh backfill gdax.BTC-EUR –days 1.
Once the data is downloaded (this can take time), we can perform our backtest. But we will have to choose which strategy to use.
You can access the list of all preconfigured Zenbot strategies by executing the following command: ./zenbot.sh list-strategies.
For this tutorial, we will test the trend_ema strategy based on exponential moving averages.
./zenbot.sh sim gdax.BTC-EUR –strategy trend_ema
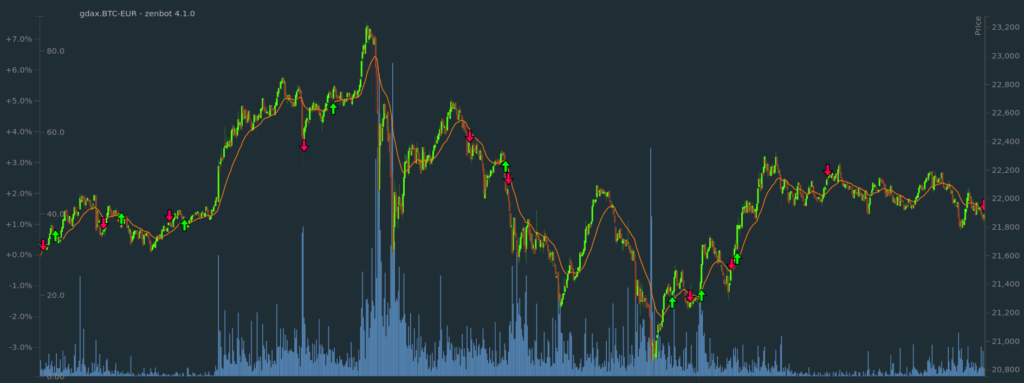
After running the backtest, an HTML file starting with “sim_result_gdax.BTC-EUR” was written to Zenbot’s simulations folder. You can open it in your browser to observe the results and the behavior of your strategy with a chart and some information about the trades of the backtest. This visualization is very interesting. Mine has 4 winning trades against 6 losing trades.
With Zenbot, you can also test your strategies in real time on the market in a fictitious way.
By executing this command ./zenbot.sh trade --paper --strategy trend_ema gdax.BTC-EUR I simulate the execution of the trend_ema strategy in the BTC-EUR market of Coinbase Pro. This method is called paper trading since it is equivalent to simulating the execution of the strategy on paper.

Your initiation to Zenbot is now over! You have discovered how to create a backtest and a real-time simulation. In a future article, we will see how to create your own strategy to customize actions. And in the meantime, don’t hesitate to read our guide on trading bots to become an expert!