Discover bots

All the answers to your questions about trading bots. How to use them? What are the traps to avoid?

[Tutorial] Improve your freqtrade strategy with machine learning

Introduction

In the previous article, we’ve made our first personalized strategy on freqtrade. Now it’s time to see if the strategy is profitable and if it’s possible to improve it through hyperopt and machine learning.

Prerequisite

  • Basic knowledge in Python.
  • A good understanding of how freqtrade works (see documentation).

Backtest

Before starting to optimize our strategy, we need to see if it would have been profitable by the past. The process to do this with freqtrade is as follows :

  • Give a pairlist to freqtrade
  • Download data from this pairlist
  • Backtester

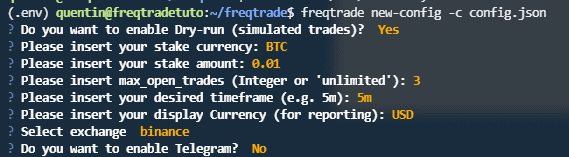
Place yourself in the freqtrade main folder and modify the previously created config.json file. It’s in this file that we will give the pairlist on wich the bot will work as well as the timeframe.

Fichier Config.json

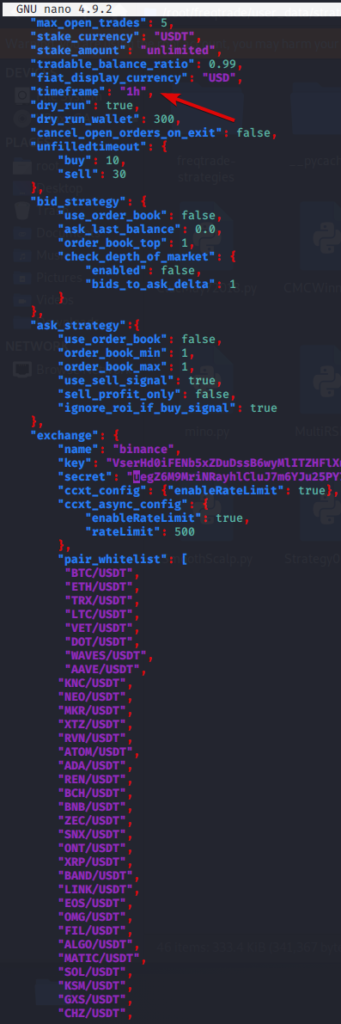
For this example, I’ve chosen a one hour timeframe and selected about fifty pairs. The more pair you have in your list, the more details you’ll have on the backtest and data as well to improve your strategy.

Let’s download the data of these pairs with the following command :

freqtrade download-data -t 1h --timerange=20210101-

-t : define the timeframe for the data. (5m,1h,4h,1d).

--timerange= : Download data from 2021/01/01 until today.

We’re now ready for our first backtest !

freqtrade backtesting -s MyStrategy --timerange=20210601-20210630

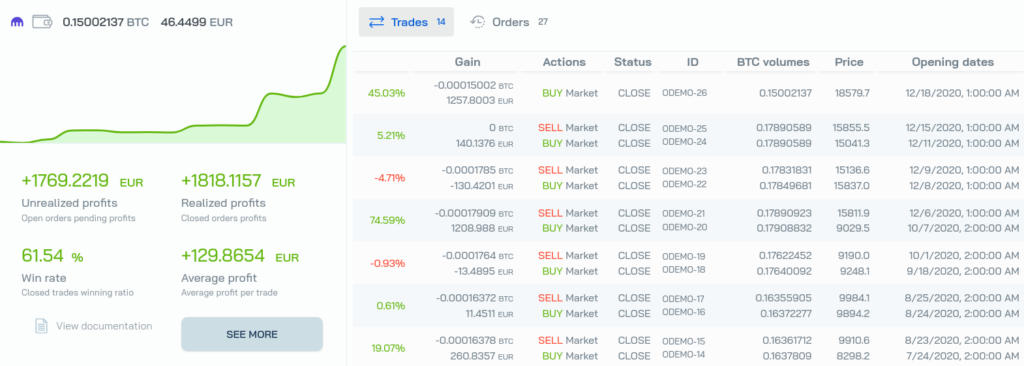
Here are the bot’s results for June of 2021 :

Backtesting the strategy

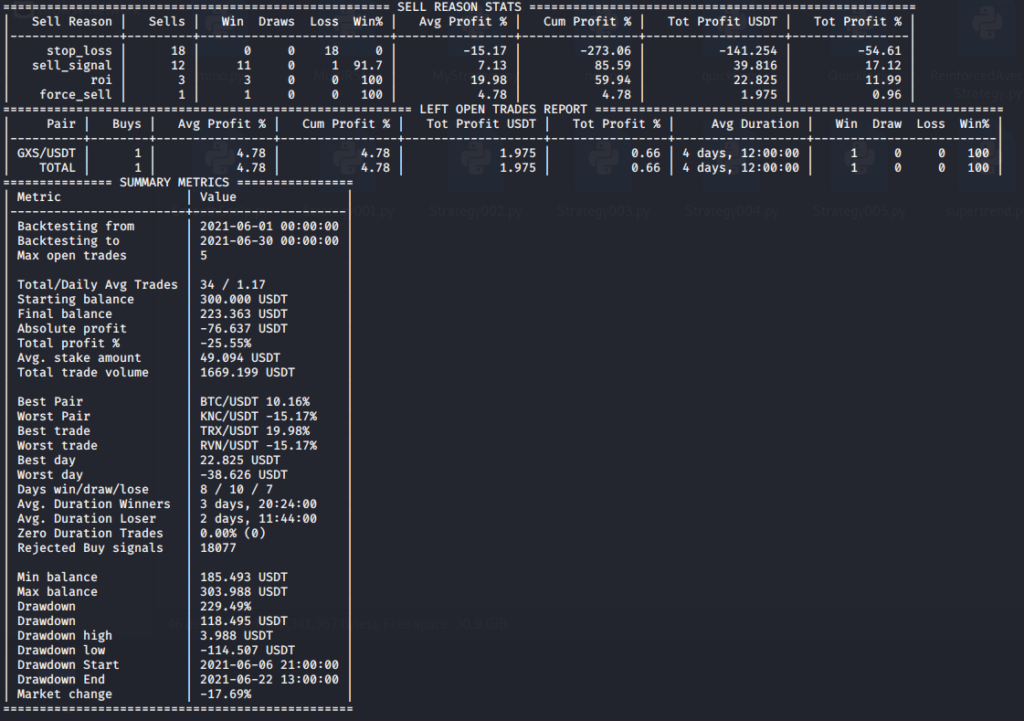
The strategy is loosing money during June. The first sell reason is because of the stop loss, maybe too close, maybe too far, Our ROI table can also be optimized to take more profits.

Let’s see how to automate the research for optimization of our stop loss and ROI table thanks to hyperopt included in freqtrade.

What is Hyperopt ?

Hyperopt is a freqtrade’s tool that will allow us to automate the research for optimal parameters for our strategy. It is applicable on technical indicators variables but also on sell, buy and stop loss variables. It’s a very powerful tool when it’s mastered and it’s really worth your time. Hyperopt will rely on the data we have downloaded before to find the best parameters, this is why it’s important to have a lot of data.
Be aware that hyperopt takes time and it’s resource hungry. Don’t hesitate to rent a VPS to do this.

Freqtrade’s Hyperopt example

We’re ready, let’s optimize our stop loss and our ROI with the following command :

freqtrade hyperopt --hyperopt-loss SharpeHyperOptLossDaily --spaces roi stoploss --strategy MyStrategy -e 100

Hyperopt has different calculation methods depending on your strategy, modes dedicated to scalping, Sharpe ratio, Sortino ration. Be sure to chose the right one according to your strategy.

-e defines how many evaluations hyperopt will do, the more you have, the more the results will be precise. Beyond 500-1000 there will usually no longer be any changes in the results.

Hyperopt in action
Hyperopt in action

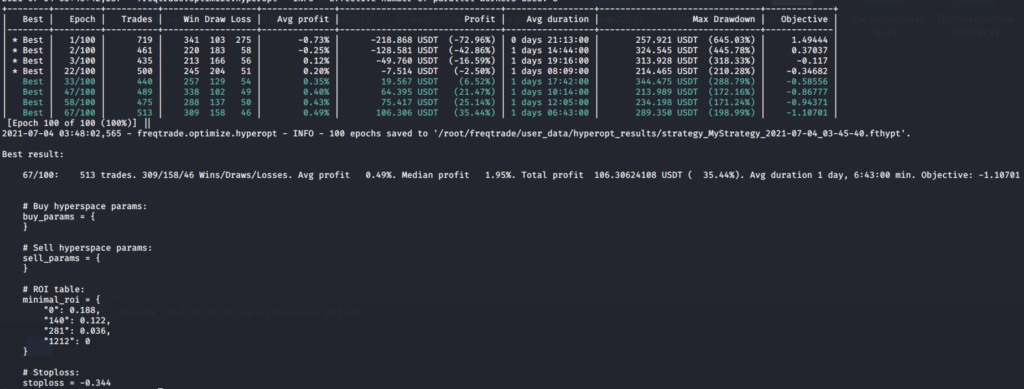
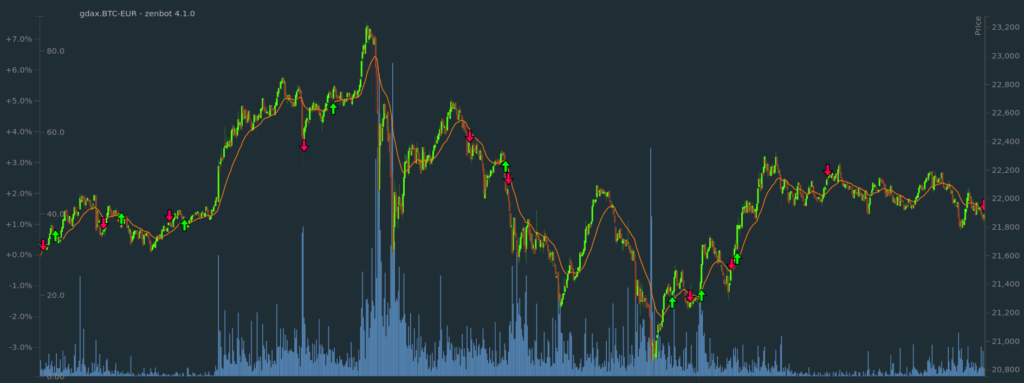
Hyperopt work is now done, we can see that it transformed our losing strategy into a winning one (since 2021-01-01) simply by modifying our ROI table and our Stop Loss. Now we just have to modify our strategy with the values provided by hyperopt and do a new backtest to see if our strategy has been improved during the month of June.

Backtest after Hyperopt

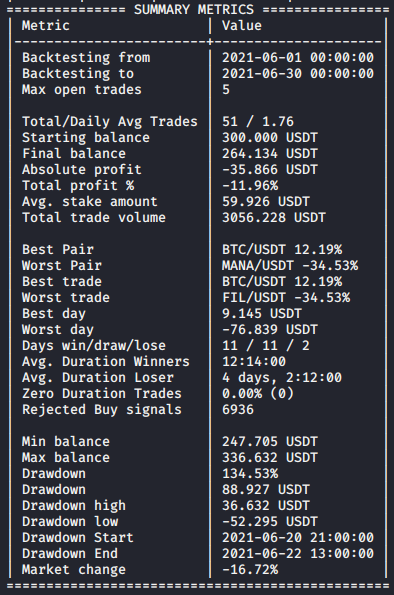
Here’s the result, our strategy is still losing but we passed from -25.55% to -11.96% !

You now have a great example of how powerful hyperopt is, all you have to do is refine your strategy automatically. Happy Trading !

[Tutorial] Improve your freqtrade strategy with machine learning Read More »

How to create your API keys on Coinbase Pro?

In this tutorial, we’ll see how to create API keys on Coinbase Pro to connect your Coinbase account to third-party services. These may be bitcoin trading bots like Botcrypto, but also tools related to taxation or viewing your assets.

What’s an API?

An API is a programming interface that allows you to “plug in” to an application to exchange data.

In our case, the API allows you to access a trading platform and perform various actions. It’s possible to restrict access to a third party via an API key. Example: Allow to view the funds in your Coinbase Pro account but prevent withdrawals.

How to create API keys on Coinbase Pro?

You must first create a Coinbase account and then go to Coinbase Pro.

Once connected to Coinbase Pro, click on the top right menu, then on API. You are now in front of your list of API keys.

List of Coinbase Pro API keys

Click on + New Api Key to open the key creation form, where you will be asked to fill in several fields.

Key creation form
Key creation form

You must choose which of your portfolios will be the target of this API key. If you have only one, leave Default Portfolio as answer.

da17ed4842a99f523ca1f24da550c854.png (668×163)

Adding a name to your key is optional but I recommend you to do it. In my case I will name it “tuto”. It’s useful to find your way around if you have several API keys.

Then check which permissions you assign to this API key. In the context of trading bots I will give him the permission to “View” to see the amount of assets in the portfolio and “Trade” to authorize trading actions (open position/buy/sell). I don’t give the “Transfer” permission because I don’t want the service I use to automate my trading to have the possibility to withdraw my money from my accounts.

A PassPhrase has been automatically generated and you can change it or keep it as is. If you don’t know what a PassPhrase is, leave the original one.

The last field is IP Whitelist if you want to restrict the use of this key to a list of IPs for more security.

Click on “Create API key” to finalize the creation of the API key.

You will surely get an authentication request via SMS or on your two factor authentication application.

Once this is done you should get a validation message for the creation of the key.

Keep carefully the private key API Secret provided. It will not be possible to retrieve it after this.

You have now succesfully created an API key!

To use this key on a service you will be asked for a public and private key. The public key is the one displayed on the card of an API key as on the previous screenshot 7ce2d5fe2ad78d9a4688d0f5af509ac6 and the private key is the API Secret you saved preciously before.

How to create your API keys on Coinbase Pro? Read More »

Everything you need to know about backtests

When you discover trading bots, you immediately want to know what the results will be. Even if it is not possible to guarantee results, we can still use tools to try to predict the behavior of a strategy. In this article, we will present backtests, one of the most well-known tools!

What is a backtest ?

A backtest is a test into the past. When we backtest a trading bot, we will test the behavior of the trading bot on the data of the last 3 days, the last 6 months, even the last 3 years with virtual funds. So there is no risk. A backtest allows us to answer the question “What would my trading bot have done if I had launched it 3 days ago, 6 months ago, 3 years ago“.

Here is an example of a backtest running on the Botcrypto platform, with the vortex-bull strategy that you can import for free from the strategy store. I have configured the backtest to test the strategy over the whole year 2020 on the bitcoin/euro pair on the Kraken trading platform. You can see at a glance the different moments when the backtest bought and sold.

Example of a backtest with the vortex-bull strategy on Botcrypto

Why you need to do backtests ?

Backtests provide a lot of information on the effectiveness of a strategy, and answer a number of questions:

  • Has the strategy been properly configured?
  • Is it effective during the test period?
  • What are its characteristics during the test period?

You can usually see many statistics and details of all orders. Here are the details of the previous backtest. There can be global statistics, such as profits made or success rate. You can also see the details of all orders, including the fees taken (virtually) by the exchange.

The detailed interface of the results of a backtest on Botcrypto

This allows you to check whether the strategy is effective during the test period. Did it take losing trades? If so, how to avoid them? Is it sensitive to fees? With this information, you can modify the strategy to improve your results.

What are the limits of backtests?

First of all, it should not be forgotten that a backtest only tests a strategy over a given period of time. The results are therefore not universal, and if your backtest took place in an uptrend, it does not give any interesting information for a downtrend. Therefore, just because a backtest of your trading bot has made +300% in the last 6 months, does not mean that your trading robot will make +300% in the next 6 months. In fact, you simply have to remember that past results are no guarantee of future results.

Moreover, backtests never completely correspond to what would have happened in reality, because they depend on factors that cannot be taken into account such as the order execution time or the spread (the price difference between the buy and sell price). All software that performs backtesting is therefore obliged to make shortcuts and simplifications. The backtest shows how everything works in theory.

These various limitations do not prevent backtests from being very useful to get an overview of the functioning and potential of a strategy.

How to make backtests?

A backtest simply consists in analyzing each candle of a given period with its strategy. Nothing prevents you from analyzing the charts by hand on TradingView to replicate how your strategy works. But most trading bots, whether ready for use, customizable or installable, allow you to do backtests almost instantaneously. This saves you a lot of time.

Obviously, if you want to backtest your own strategies, you would have to go through platforms that allow you to design strategies, such as our Botcrypto platform where no technical knowledge is required, or Freqtrade where we have written an installation and configuration tutorial.

Our tips for setting up the best backtests

Finally, here are some tips to configure the best backtests :

  • Reproduce the backtests with the conditions closest to your trading conditions to get the most relevant results. If you can set the initial backtest funds, set a realistic amount. If you can configure the fee taken by the platform, configure that as well.
  • Perform multiple backtests in different market conditions. If you’re looking to build a strategy that takes advantage of Bitcoin’s volatility, don’t settle for just one backtest. Instead, try to run several backtests, on different trends, over different periods of time, to get the most representative results possible.
  • When building a strategy, change only one parameter at a time between each backtest. This will make it easier to understand the results of the backtests.
  • And if you are satisfied with the result of your strategy, then save it, with a copy for example. This will prevent you from losing your progress in the search process.

Everything you need to know about backtests Read More »

[Tutorial] Your first trading bot with Zenbot

Introduction

Zenbot is a free and open source bitcoin and crypto trading bot. It is used in command line and relies on Node.js and MongoDB. It is a serious competitor of Freqtrade that we have already mentioned. It is used on the command line and is therefore rather reserved for confirmed users. To create trading bots without technical knowledge, visit Botcrypto!

Prerequisites

This tutorial has been realized on a Ubuntu 20.04 server.

We will need Node.js, MongoDB and git.

  • To install the various prerequisites, run the following command:

sudo apt update && sudo apt install git && sudo apt install nodejs && sudo apt install npm && sudo apt-get install build-essential mongodb

Zenbot’s installation

  • First, we will clone the git repository by executing the command below:

git clone https://github.com/deviavir/zenbot.git

  • Once the download is complete, we will go to the zenbot folder:

cd zenbot

  • Then we will install the dependencies with the following two commands:

npm install

sudo npm link

Zenbot’s configuration

Zenbot can be configured in different ways. We will create a configuration file based on the example provided.

  • Execute this command to create your conf.js configuration file.

cp conf-sample.js conf.js

You can if you want check the different possible configurations of Zenbot by opening this file but for this tutorial we will keep the basic settings.

Zenbot’s usage

We will see how to do a backtest, a test in the past.

First you can use the command ./zenbot.sh list-selector to see all available pairs.

  • To perform a backtest we will need the data of a market. We will retrieve the BTC/EUR market of Coinbase Pro over 1 day with this command: ./zenbot.sh backfill gdax.BTC-EUR –days 1.

Once the data is downloaded (this can take time), we can perform our backtest. But we will have to choose which strategy to use.

You can access the list of all preconfigured Zenbot strategies by executing the following command: ./zenbot.sh list-strategies.

For this tutorial, we will test the trend_ema strategy based on exponential moving averages.

  • ./zenbot.sh sim gdax.BTC-EUR –strategy trend_ema

After running the backtest, an HTML file starting with “sim_result_gdax.BTC-EUR” was written to Zenbot’s simulations folder. You can open it in your browser to observe the results and the behavior of your strategy with a chart and some information about the trades of the backtest. This visualization is very interesting. Mine has 4 winning trades against 6 losing trades.

Results of my backtest with Zenbot

With Zenbot, you can also test your strategies in real time on the market in a fictitious way.

By executing this command ./zenbot.sh trade --paper --strategy trend_ema gdax.BTC-EUR I simulate the execution of the trend_ema strategy in the BTC-EUR market of Coinbase Pro. This method is called paper trading since it is equivalent to simulating the execution of the strategy on paper.

Running the strategy simulation on Zenbot

Your initiation to Zenbot is now over! You have discovered how to create a backtest and a real-time simulation. In a future article, we will see how to create your own strategy to customize actions. And in the meantime, don’t hesitate to read our guide on trading bots to become an expert!

[Tutorial] Your first trading bot with Zenbot Read More »

[Tutorial] Create your own trading bot strategy with Freqtrade

Introduction

In our last article, we saw how to create our first trading bot with Freqtrade, but his results were not satisfactory. We will now discover how to build our own customized strategy.

Prerequisite

  • A full installation of Freqtrade, see our article.
  • Basics of technical analysis.
  • Basics in the python computer language.

Creation of a new strategy on Freqtrade

The strategies usable by Freqtrade are stored in the freqtrade/user_data/strategies folder and are python (.py) files.

To start, move to a terminal in the /freqtrade folder and activate its virtual environment with this command :

source .env/bin/activate;

Then create a new strategy called MyStrategy.

freqtrade new-strategy --strategy MyStrategy

After executing this command, a MyStrategy.py file was created in /freqtrade/user_data/strategies. It is this file that we will customize throughout this article. The final file is available at the end of the article.

Configuration of the strategy on Freqtrade

Configuring strategy settings

Open the MyStrategy.py file with a text editor. In the class, we will specify parameters that our strategy will have to respect.

We start by defining the minimal_roi, ROI meaning return on investment, which allows us to define to sell our assets at any moment of the strategy if a percentage of profit is reached independently from the rest of the strategy. For this tutorial, I have chosen a minimal_roi that at any moment of the strategy will engage a sale if the profits exceed 50%. Furthermore, if the trade has been open for more than 40 minutes, then a sale will be issued if the profits exceed 20%.

minimal_roi = {
  "40": 0.2,
  "0": 0.5
}

We are also going to set up a stop loss, to avoid having too big losses.

stoploss = -0.15

With this stop loss, if one of my trades registers a loss of more than 15%, a sell order will be issued.

We will then choose a unit of time for our bot this way (here, 5 minutes).

timeframe = '5m'
Addition of technical indicators to the strategy

To add technical indicators to the strategy, we will modify the populate_indicators function. In this tutorial, I will use the Relative Strength Index, a technical indicator that we have already discussed many times.

dataframe['rsi'] = ta.RSI(dataframe)

After adding the indicator (you can of course add more), I end this function with a dataframe return.

return dataframe
Addition of conditions of buy/sell

To add a buy condition, we need to modify the function named populate_buy_trend and then add our condition inside as well as a return of the dataframe like this.

dataframe.loc[
(
(dataframe['rsi'] < 30)
),
'buy'] = 1

return dataframe

In this example, I decide that a buy order is sent if the ROI is less than 30.

It works the same way for the sell condition. I decide that a sell order is issued when the ROI is greater than 70.

dataframe.loc[
(
(dataframe['rsi'] > 70)
),
'sell'] = 1

return dataframe

There you go! All that remains is to test our strategy. If you don’t know how to do it, I redirect you to our tutorial on how to use Freqtrade, where we presented how it works in general. This strategy is not intended to be implemented with your funds. It is very simple, and its main interest is to show you how to build your own strategy with Freqtrade. You now have all the cards in hand to create and customize your trading bots with Freqtrade! The next step is to increase the results of your strategy with an incredible freqtrade feature, Hyperopt. Happy trading!

[Tutorial] Create your own trading bot strategy with Freqtrade Read More »

Comparison of the best free and open source crypto trading bots

In this article, I will compare different open source crypto trading bots. Open source trading bots have several advantages. They are particularly reliable because anyone can check and correct their code. They also have many different features. They are very complete products that have nothing to envy to commercial solutions, even though they are available for free. Pretty interesting, isn’t it? The main drawback is related to the interface and the use. Generally speaking, you need fairly advanced technical knowledge to understand and deploy them.

You’ve heard about trading bots, but you’re still not sure what they are and how they work? Then go ahead and read our ultimate guide to trading bots.

For each project, the title corresponds to a link to the bot’s GitHub repository.

Zenbot

Zenbot is a command line crypto trading bot. It uses node.js and MongoDB to operate. Zenbot supports Windows/Linux /MacOS 10 (or via Docker).

Zenbot supports a large number of exchanges and offers the way via a plugin to add even more to the list. It has most of the normal and advanced features that you can ask a trading bot for.

Active developmentyes
Easy to installyes
Easy to useyes
Backtestsyes
Manual orderyes
Graphical interfaceno
Webhooksyes

Hummingbot

Hummingbot is software that allows you to create and execute customizable trading strategies on Windows/Linux/MacOS.

Hummingbot has a documentation and an academy allowing a fast and complete learning of the tool. Its installation couldn’t be easier.

Active developmentyes
Easy to installyes
Easy to useyes
Backtestsno
Manual orderno
Graphical interfaceno
Webhooksno

Gekko

Gekko is a platform for automating trading strategies in the cryptocurrency markets and can be used on the most popular operating systems (Windows, Linux and MacOS).

Gekko has a web interface which makes it easier to use, but is unfortunately no longer maintained.

Active developmentno
Easy to installno
Easy to useyes
Backtestsyes
Manual orderno
Graphical interfaceyes
Webhooksno

Freqtrade

Freqtrade is an algorithmic crypto trading software developed in python (3.6+) and supported on Windows, Linux and MacOS.

It is designed to support all major exchanges and be controlled by Telegram. It contains tools for backtesting and portfolio management as well as strategy optimization by machine learning. You can find our article on how to create your first trading robot with Freqtrade at this address.

Active developmentyes
Easy to installyes
Easy to useno
Backtestsyes
Manual orderno
Graphical interfaceno
Webhooksyes

So much for this comparison! You now know the advantages and disadvantages of the main open source trading bots for trading bitcoin and ethers. Do you know others? Have you developed your own? Tell us about it!

Comparison of the best free and open source crypto trading bots Read More »

The 5 types of trading bots

When we start to be interested in trading bots, we realize that there are many of them with their own characteristics. In this article we will introduce you to the different categories of trading bots.

There are trading bots with very different characteristics. Explanations.

Open source trading bots

Open source trading bots are free software that you can install and configure for free. They usually offer many features and one of their strong points is customization. On the other hand, you usually need a minimum of technical knowledge to install and configure them. The configuration of the strategies is usually done with code or pseudo code, although in some cases you can download strategies from the Internet. Deployment is also to be taken into account. In general, one avoids deploying this type of software on one’s personal computer, as one would not be able to turn it off and would be dependent on one’s personal environment.

Cost : free (unless deployed on a dedicated server)
Examples : Freqtrade ([Tutorial] Your first trading bot with Freqtrade) , Zenbot, …

The source code of Freqtrade, a trading bot, on GitHub

Customizable online trading bots

Many services offer customizable online trading bots. Compared to open source trading bots, you can also customize them, but you don’t have to worry about deploying them. The company takes care of their execution and maintenance in the cloud. Some are distinguished by 100% visual interfaces where you can configure and customize your trading bots without technical knowledge. This is for example what we offer at Botcrypto.

Cost : a subscription (starting at $10 per month in general) or fees

An example of a strategy customizable without technical knowledge on Botcrypto

Ready for use online trading bots

The trading bots that we call ready for use are among the easiest to handle. Their developers have developed one or more strategies that you don’t usually know and control. Once you set up your trading platform, everything is automatic. There is no need for technical knowledge, but you must have absolute confidence in their developers since you don’t know what the applied strategy is.

Cost : a subscription (starting at $10 per month in general) or fees

Copy trading online trading bots

Copy trading consists in replicating the actions of other traders considered competent. Some companies have replicated this model with trading bots: some traders create trading bots (with or without a visual interface), others replicate these trading bots (but without knowing the behavior of the strategy). It is in fact a mix between the two previous categories, customizable trading bots and ready for use trading bots. You usually have a marketplace, where you can access all available trading bots, which are usually rated by their users.

Cost : a subscription (starting at $10 per month in general) or fees

Scams

Unfortunately, trading bots attract many investors who think they can get regular income easily. That’s why there are many scams in the world of trading bots. Avoid services that promise guaranteed performance, and be very careful!

Cost : everything 🙃

The 5 types of trading bots Read More »

With Dollar-Cost Averaging, invest serenely in bitcoin and cryptos

Have you heard of bitcoin? Do you want to invest in bitcoin or another cryptocurrency? Then Dollar-Cost Averaging is surely THE method you need to discover now.

What is Dollar-Cost Averaging?

This simple strategy consists of investing the same amount of money at regular intervals in order to reduce the risks associated with volatility. It is mainly intended for investors who aim for the long term. Instead of buying $1,000 of bitcoin tomorrow and taking the risk that it will lose 20% of its value in the following weeks, you can buy for $100 every month, thus smoothing your investment over time.

But does it actually work? Does Dollar-Cost Averaging improve returns and reduce risk in the long term?

Dollar-Cost Averaging in a concrete example

Let’s take a concrete example, where you discover bitcoin 3 years ago and see what happens with and without it.

Without Dollar-Cost Averaging

If you had invested this 3600$ on December 3rd 2017, you would have received 0.32 BTC. 0.32 BTC is worth $6176 at the time of writing. It is therefore a good investment but the value of your investments will have fluctuated enormously over time especially with the bursting of the bubble in early 2018.

Without Dollar-Cost Averaging

Let’s imagine that instead of buying for $3,600 3 years ago, you would have bought $100 worth of Bitcoin every month. On the dcabtc.com calculator, we can see that with the Dollar-Cost Average strategy, you would have 6812$ today. That’s nearly $700 more by investing the same amount!

Screenshot of Dollar-Cost Average simulator dcabtc.com

So obviously, this added value depends on when you start your investment. In some cases where you invest at exactly the right time, Dollar-Cost Averaging will be less effective. But investing at the right time is not that easy. Dollar-Cost Averaging overcomes this difficulty by smoothing investments and reducing the risk of investing at the wrong time.

How to make a success of this strategy?

You must be wondering why I’m talking about the success of his strategy. How could we fail? It’s quite simple, isn’t it? Well, it’s not.

First, you need to define the parameters of your Dollar-Cost Averaging strategy. For example, if you want to invest in Bitcoin, you can for example choose to invest €100 every month, or €20 per week, or even €5 per day! Of course, it all depends on how much you can afford and what you want. These parameters are at your discretion.

Then, the only rule is to respect these parameters. And you’ll see that it’s not going to be that easy, especially with cryptocurrencies, which are very volatile assets. When prices go up or down all at once, it’s going to be very tempting to accelerate your investments, or to let some time go by. But then you lose all the advantage of Dollar-Cost Averaging.

An interesting solution is to use software that sends the purchase orders for you. Our platform Botcrypto allows you to easily set up trading bots that apply Dollar-Cost Averaging strategies. With a few clicks you can start your trading bot that applies a strategy like the one below, where every month a buy order for $100 of Bitcoins is sent.

Screenshot of a Dollar-Cost Averaging and bitcoin strategy on Botcrypto
This strategy buys for $100, waits 30 days, buys for $100, waits 30 days, etc.

This way, no need to log on to an exchange every month. Your trading bots take care of applying your strategy for you. You can import this strategy for free from the Botcrypto store. It’s the Monthly DCA strategy.


In conclusion, Dollar-Cost Averaging is a very interesting investment method for all those who want to invest in Bitcoin and cryptocurrencies on a long-term basis, without having to think about it on a daily basis. With this method, you reduce the risk, both upwards and downwards, but what is certain is that you gain peace of mind!

With Dollar-Cost Averaging, invest serenely in bitcoin and cryptos Read More »

[Tutorial] Your first trading bot with Freqtrade

Introduction

Freqtrade is a free and open source crypto trading software. With Freqtrade, you can create fully customizable trading bots, make backtests, etc… The software is developed in python and is compatible with Windows, MacOS and Linux.

Tutorial’s goal : install Freqtrade and perform a backtest with a basic strategy

This tutorial is intended both for people wishing to create their first crypto trading bot and for curious people wishing to discover how Freqtrade works. Freqtrade does not offer a graphical user interface, and it is rather reserved for users with technical knowledge. If you want to easily and quickly create crypto trading bots, take a look at our platform Botcrypto. The registration is free!

Prerequisites

This tutorial has been realized on a Ubuntu 20.04 server.

We will need python3 and git.

  • To install the various prerequisites, run the following command:

sudo apt install git && sudo apt install python3 && sudo apt install python3-pip && sudo apt install python3-venv

Freqtrade’s installation

  • First, we will clone the git repository by executing the command below:

git clone https://github.com/freqtrade/freqtrade.git

  • Once the download is complete, we will go to the freqtrade folder:

cd freqtrade

  • Then we will execute as administrator the installation script setup.sh :

sudo ./setup.sh --install

L'installation du logiciel
Installation of the software

For both downloading development dependencies and resetting the git branch, press the <Enter> key to choose the default value (which is ‘no’ in both cases).

Freqtrade’s configuration

  • In order to use Freqtrade, you need to activate his virtual environment :

source .env/bin/activate;

You can now use the Freqtrade commands. First we will choose different parameters for your first robot.

  • Execute the command freqtrade new-config -c config.json
Freqtrade's configuration
The configuration

For each question, press the <Enter> key to choose the default value.

Freqtrade’s usage

  • To create a strategy called test, simply execute the following command:

freqtrade new-strategy --strategy test

A strategy with default values is then created. We will see in a future tutorial how to customize this strategy.

Now we will use this strategy in a backtest, a test in the past. We will need the old market data.

  • Execute freqtrade download-data to download old market data.

Downloading market data can take a few minutes.

  • Once the download is complete, run :

freqtrade backtesting --strategy test

Once the backtest is complete, you will see a summary of its results.

My backtest results with Freqtrade
My backtest results

We can see from the results of my bot that it was not very efficient:

-36.32% in a month in which the market lost only 10.2%. My bot made me lose 3.6x more money than if I had just invested…

We notice that the robot has 20 winning trades against 7 losers which questions us on the reason of the final result. We notice via the Worst day value that one day the robot lost 28.54%, which is considerable. If we had personalized our strategy by better managing our risk, this would not have happened. And that’s the subject of our next article 😉 [Tutorial] Create your own trading bot strategy with Freqtrade. In the meantime, you can consult our guide about trading bots to learn more about trading bots.

[Tutorial] Your first trading bot with Freqtrade Read More »

What is a trading bot? How does it work?

Trading bots are the object of many fantasies, but what is a trading bot really? For the first article in our guide about trading bots, we believe it is essential to define them, to put an end to all speculation (no pun intended).

What is a trading bot?

A trading bot is software that trades, i.e. buys and sells assets with the aim of making a profit. There are trading bots for all types of assets: for cryptocurrencies such as bitcoin or ether, but also for shares, currencies, etc. Just as a trader will monitor the markets to find the best opportunities, a trading bot will monitor the markets and react to conditions with actions.

For example, a trading bot will monitor the bitcoin/dollar market (BTC/USD), and as soon as the price of Bitcoin exceeds $12,000 (this is the condition), it will sell 1 BTC (this is the action).

All these conditions and actions are pre-programmed by traders (maybe you soon 😉). Of course, conditions and actions can be much more complex, using technical analysis tools, artificial intelligence, etc.

At the end of this guide, you will know everything you need about trading bots

What is the purpose of a trading bot?

Trading bots are generally used to generate profits, but they can also be used to invest more efficiently (e.g. with the Dollar Cost Averaging strategies wel will discuss later), or even to protect your capital.

Of course, a distinction must be made between trading bots for individuals and for companies. The needs are not at all the same, and neither are the budgets… We will speak very little about high frequency trading and arbitrage for individuals since these activities require specific infrastructures.

How does it work?

For anyone interested in knowing how it works, here are some explanations. Without going into technical details, we are talking about a software that:

  • retrieves market data
  • checks conditions (if the price of bitcoin exceeds X €, if the exchange volume increases by Y%, …)
  • execute actions (sell Z BTC, …)

And that’s it! Thanks to a dedicated interface, called an API, a trading bot can send orders on your behalf directly to your preferred exchange. For this reason, you generally need to provide API keys to all services that use an API. This is simply to identify and authenticate you.

General operation of trading bots (in French, sorry!)

Finally, a trading bot must be operational 24/7, otherwise it loses much of its interest. This is why they are usually deployed on servers in the cloud. We strongly advise against hosting your trading bot yourself without having the skills and the time. If you want to know more about this, join our Discord server to discuss with our team. We will be happy to discuss this with you.


Now you know what a trading bot is, and even how it works! Now you want to know what the real advantages of trading bots are? That’s good, that’s the subject of the next article!

What is a trading bot? How does it work? Read More »